AR15 Uppers, Lowers and Rails Page 1 Page 2 Page 3 Page 4 Page 5 Page 6 Page 7
TO
VIEW FULL SIZE IMAGES: USERNAME and
PASSWORD are both "mm"
Vltor Weapon Systems KeyMod Data Package
| 7/25/12 - Vltor Weapon Systems released the Data Package for their KeyMod (KM) System today. The KeyMod System is a new rail interface system developed by Vltor. Rather than keep it proprietary, Vltor is putting the Data Package in the public domain for anyone to use. The KM System was introduced at the 2012 SHOT Show, with Noveske Rifleworks being the first to offer a handguard with the KM system, in their NSR Rail. Back in December, 2011, Eric shared with me the first drawings of his planned KeyMod system. Since then, I've followed the develpment of the system with interest and impatience. The KeyMod system uses keyhole-shaped holes in the handguard, with bevels on the back, to automatically center direct-attach accessories as they are installed. All access is from the outside of the rail with captured screws. Besides the handguard, Vltor and Noveske will be offering accessories for the KM system. 1913 rails can also be attached to the KM handguards for use with any Picatinny-compatible accessories. The press release from Eric Kincel is as follows:
The Vltor VIS KM (KeyMod) is currently in the works - shown below are renderings of the planned offerings. Vltor will be offering the same four lengths as before (7, 9, 10 and 12-inch). Relevant to suppressor users, the internal dimension of the VIS KM is 1.400" (without the heat shield) and 1.125" with heat shield. The outside diameter is 1.725 inches. The total height (from the top of the Picatinny Rail to the bottom handguard) is 2.125". Noveske will be getting the first quantity of VIS KMs, followed by the release to the general public, under the Vltor banner. The Noveske NSR rail is a one-piece handguard system for the AR-15, and differs in size and shape from the VIS KM.
The Data Package drawings are shown below. Download the .pdf file here (you can open it or right click and 'save as'). Manufacturers are free to use the Data Package to design handguards or associated accessories for the KM system without needing consent from Vltor, or paying any royalty fees etc.
The prototype VIS KMs are illustrated below, along with equivalent VIS uppers to show the difference in weight. Each VIS KM version averages a 6 ounce weight reduction over the original VIS system. More information will be added as it becomes available.
|


| 10/6/12 - The NSR Handguard from Noveske Rifle Works is the first handguard to offer the KeyMod (KM) System. The KM System is a collaboration between Vltor Weapon Systems and Noveske Rifleworks. The KM System offers a mounting platform for a variety of accessories and components. In July, Vltor Weapon Systems released the Data Package for the Keymod (KM) system so any manufacturer can adopt it or make accessories for it, royalty-free. General Description - The idea behind the KeyMod system is to get rid of the need for a secondary interface (rail) for attaching accessories. Without side and bottom rails, the NSR handguard achieves Noveske's goal of being one of the lightest and narrowest free floating forend options for the AR15/M16 family of weapons. The outer width of the NSR handguard before accessories have been installed is only 1.48". Inside width is 1.325". Height from the top of the rail to the bottom is 1.95". The NSR handguard is available for sale as standard equipment on Noveske's rifles and upper assemblies, as well as a separate component. The NSR-13.5 handguard pictured here is 13.5" long. The NSR is available in 7", 9", 11", 13.5", and 16.7" lengths. All of them share the following features:
The steel barrel nut weighs 3.1 oz and the NSR-13.5 handguard weighs 7.9 oz. The weights of the other length handguards are listed on Noveske's website. Handguard - The handguard is very narrow, and even my small hand can grab around it completely. The NSR has a standard 1913 rail on top, at the same level as the receiver flat top. The top rib is ventilated on both sides with slots. At 3, 6, and 9 o'clock, the NSR has rows of the KeyMod 'keyholes'. At the 10:30 and 1:30 positions, there are rows of long slots. At 4:30 and 7:30 are rows of shorter slots, and holes in between the slots. At the rear of the handguard are holes for the mounting screws, that secure it to the barrel nut. Barrel nut - The steel barrel nut is cylindrical and is actually reversible; it has internal threads on both ends. The threads are timed 15° from one another so that the installer has a total of 24 timing positions with the upper receiver. The two rows of threaded holes around the outside of the barrel nut are what need to be timed such that the handguard is aligned properly with the flat top rail. The barrel nut has flats between the rows of holes for a 1-1/16" crowfoot wrench.
Installation - You have to start off with the gas block removed, obviously, to install the NSR barrel nut. The barrel nut is slid over the barrel, and the barrel extension inserted into the receiver. Noveske recommends putting moly grease on the receiver threads and front of the barrel extension. The barrel nut is then installed hand-tight, noting the position of the handguard mounting screw holes. A row of handguard screw holes needs to be just past the 12 o'clock position when hand tight. Try flipping the barrel nut over to get the best alignment. The barrel nut is then torqued to 40 ft-lbs. It's then loosened then torqued again, twice. The use of a receiver block is required for this process. Moly grease is re-applied, and the barrel nut torqued down to 40 ft-lbs. The barrel nut must be aligned with the threaded holes at 12, 3, 6 and 9 o'clock. To achieve this alignment, the barrel nut can be torqued to a maximum of 80 ft-lbs, to align to the next screw hole if needed. If alignment cannot be achieved, flip the barrel nut over and start the process of torquing, loosening and re-torquing over again. The tricky part, in my case, was finding a wrench to fit the barrel nut. You can use either a 1-1/16" or 27mm crowfoot, but it must be 0.5" thick or less, as the width of the flats on the barrel is only 0.5". I had to take a dremel to grind down the Sunex 27mm crowfoot you see below. It was a pain in the butt, but I already had it, and didn't want to spend the cash on a Snap-on. Took me about 20 minutes of hand grinding with a dremel. Other folks have had the same issues finding a crowfoot that's narrow enough. An adjustable wrench is too thick (I tried that too). I think that the width of the flat could have been increased to about .65" without any consquence (that I'm aware of) - I'd like to see something like that happen. The two rows of holes would just be a little further apart, and the barrel nut a bit longer. The other hiccup I ran into was my gas block. I wanted to retain the pinned gas block that came on my M4 barrel, so I cut it down. Cut the fixed sight off, as well as the bayonet lug and swivel. Went to slide the handguard over it, and it wouldn't fit. I had to shape it to emulate that of a low profile gas block (more dremel work). I finished it with a few passes of high-temp engine paint I had sitting around. It didn't have to be pretty since it's barely visible through the holes in the handguard. Unless you want to spend time modifying a fixed FSB, I'd recommend just getting a low profile gas block like a Vltor.
Once I ensured that I had good clearance on all sides of the gas block, and the inside of the handguard, I installed the handguard onto the barrel nut. When the screws are installed, but not tightened down, there's a tiny bit of rotational play that you have to work with, if the barrel nut isn't perfectly aligned to 12 o'clock. I used an old Trijicon ACOG mount to clamp both the receiver top rail and the handguard, so that the handguard top rail was aligned with the receiver rail. I then installed the six screws with blue loctite and tightened them up per the instructions.
KeyMod Interface - In the previous article above, where the drawings for the KeyMod system were released by Vltor, the description of how the system works may not have been completely clear. The photos of the accessories below will help illustrate the system. Paraphrased from the Noveske website: The KeyMod system offers a mounting platform for a variety of (future) accessories and components. The KeyMod self-contained components/mounting hardware index and V-block onto the platform, achieving a secured and accurate hold to the system, while separate lugs take the recoil force off the fasteners. The pass through attachment method eliminates the need for loose screws and backing plates that can easily be lost, or difficult to install. Another advantage of the KeyMod system over the 1913 system is the direct attach eliminates the need for the 1913 system as a "middle Man" thereby reducing weight and accessory off-set from the center of the handguard. The two accessories below illustrate how the KeyMod system works. On the QD sling mount, there are two mounting screws, each with a captured accessory nut. The nut is flat on two sides, which prevents it from rotating. The nut has tapers which match the chamfer on the back of the keyholes in the handguard. This makes them self-centering, and prevents any up or downward movement of the accessory on the rail. To install the sling mount, the screws are loosened and the nuts passed through the rear of the keyholes. The mount is then slid forward, and a small counter-recoil lug on the front hooks into the keyhole in front of the mount, preventing it from moving backwards. The screws are then tightened. The QD sling swivel mount is rotation limited so that the swivel doesn't rotate. The 5-slot KeyMod 1913 Section utilizes a different method for counter recoil. Instead of the small lug on the front, it has a round lug behind the forward accessory nut. This lug fits into the round part of the keyhole and prevents any forward or aft movement of the rail section.
Noveske offers Polymer Panel sets for the NSR in black, foliage green and flat dark earth (FDE). They're very low profile and have a molded texture for a secure grip. Each set includes one long panel which covers 7 KeyMod slots, four short panels which cover one slot each, one locking panel, one rear handstop (the longer one) and a front handstop (the shorter one). Both handstops lock by themselves. If you look closely at the panels, you'll see that only the locking panels have a small T-slit on the outside, and a semi-circle on the back which engages the keyhole. The panels are installed by inserting the keyhole-shaped lugs on the back into the keyhole, and sliding the panels forward. A locking panel is required to keep them from sliding backwards. Removing the locking panels is a bit of a pain, as a thin instrument or hook needs to lift up on the split tabs to disengage the semi-circular locking lug while pushing rearwards on the panel. If you want to cover the bottom and two sides of the handguard, you'll need two sets.
Notes/Observations - The most obvious attribute to anyone who picks up an NSR-equipped rifle is how narrow/slim the handguard is. Granted, the lack of rails would make any handguard slimmer, but the NSR might be the narrowest one so far, in the tubular/slick handguard category. Yes, there are other tubular/slick rails out on the market, but the main difference is that the KeyMod system on the NSR serve both as vent holes and as a mounting system. Other rails with holes and slots can make use of the excellent Mount 'n' Slot accessories from Impact Weapon Components, but the backing plates can sometimes be a bit of a pain to get in place, and aren't as conducive to quick on/off as the KeyMod. As time goes on, we're going to see more and more KeyMod-compatible mounts and accessories hit the market. It just makes a lot of sense.
The other thing that people notice is how light it is (in this particular configuration). I've configured the rifle above with a standard M4 barrel with carbine gas system. The back up sights are from a HK MP7. Instead mounting the front flip-up sight all the way at the end of the handguard, I chose to mount the front flip-up sight as shown below to free up the front of the top rail on the handguard for accessories (such as the INFORCE WML pictured). Mounted at 12 o'clock, the WML button is perfectly placed for thumb activation. Yes, I give up some sight radius, but it's no worse that an M4 with fixed front sight base, as I have the front sight mounted just above the gas block. This is best done with a rifle-length handguard, as a carbine or midlength would not have enough space to do so. The short section of rail is there for throwing a bipod on, which I only use when zeroing the weapon; then I take it off for regular use. The NSR panels are pretty comfortable and grippy, but I'd love to see TangoDown come out with some of their SCAR panels for the NSR, as I really like that texture. I also thought that the NSR hand stop could be rounded a little more on the edges, or shaped more like the IWC or Gear Sector hand stops to be more ergonomic.
At the range, the NSR felt feather light, and very nimble. I was curious about how hot the handguard would get, as it's narrow and doesn't have a heat shield, so I did a lot of shooting without gloves on. I was surprised to find that it didn't heat up as much as I expected it would. Even after doing three full mag dumps in a row. The extensive ventilation probably has a lot to do with it, plus the aluminum isn't very thick such that it retains much heat. The small diameter of the handguard makes it easy to wrap my support hand around, but I might go to a short vertical grip when they become available. I find them more comfortable than handstops in general, for most positions. I really like the KeyMod system and think that it has a lot of potential; and really look forward to seeing more accessories and mounts become available for it. |


Centurion Arms 5.56 Modular Rail (CMR) System
| 7/5/13 - The CMR Rail System from Centurion Arms is their new handguard that we first caught a glimpse of at the 2013 SHOT Show. It's a light weight, tubular, one-piece free float hand guard that provides a continuous 12 o'clock rail and a very slim profile. The CMR system clamps to a proprietary barrel nut that can be installed on all AR-15/M-16 type weapons, and comes in both 5.56 and 7.62 versions. General Description - When I bumped into Monty (owner of Centurion Arms) at the SHOT Show, he pulled the CMR out of his bag for me to take a look at it. There have been many tubular handguards on the market, so I'm a little jaded when it comes to new handguards. However, when I saw and held the CMR, I got pretty excited. It was very slim one-piece hand guard, and very light weight. Plus it looked really good. The main objective of the CMR was to have a smaller, lighter, more ergonomic handguard that maintained or enhanced the functionality for the end user. Centurion decided to go with their own mounting system for accessories, rather than go with the standard 1913 rails or large holes/slots. There are no rails in the 3, 6 and 9 o'clock positions, but a series of threaded holes which allow accessories to be direct-mounted, thus saving weight and keeping it simple. The CMR does allow for rails to be added if needed. It also has built-in anti-rotation QD sling swivel sockets at the front and rear of the handguard. The CMR is offered in two lengths for the both the 5.56 and 7.62 versions; 12" and 14". The actual lengths are 12.56" and 13.688" respectively. Here is a list of key features:
Handguard - At first glance, the CMR looks like a 'standard' extruded tubular handguard. Closer examination reveals that it's fully machined. The inside has a mostly rounded cross-section with thicker areas at 3, 6 and 9 o'clock for the threaded holes and the outside is machined with flats at 3, 6 and 9 o'clock and has more of a smoothed-out octogonal exterior cross section. The flats are for the mounting of direct-attach accessories. The small holes on the 3, 6 and 9 o'clock flats are threaded. The three on each side closest to the front have helicoil inserts to prevent stripping from thread wear, as those are probably going to be the ones used most often. The CMR has a continuous 1913 top rail at the same level as the flat top receiver's rail, with holes on top spaced about 1.6" apart. Two rows of staggered vent/cooling holes are machined into the side of the top rail and upper half of the handguard. Rows of larger vent holes are machined into the bottom of the handguard at the 5 and 7 o'clock positions. All edges are smoothed out; there are no sharp edges on this handguard, even on the vent holes and top rail. It's very comfortable to hold. The handguard is very narrow at only 1.995" tall and 1.56" wide. Even my small hands can grab around it completely. Rotation-limited QD sling swivel sockets are provided at the rear and front of the handguard, for a total of four possible sling mounting locations. At the rear of the handguard is the barrel nut clamp, and anti-rotation tabs.
At the rear of the handguard is the barrel nut clamp, and anti-rotation tabs. The steel barrel nut is cylindrical and has a row of holes around its circumference. These holes are used in conjunction with a spanner or pin wrench to tighten it. The rear of the handguard slips over the barrel nut, and is secured by tightening the three clamp screws. The barrel nut has a groove in which the center clamp screw sits; preventing the handguard from moving forward. There are anti-rotation tabs located at the rear, just below the top rail. These tabs extend on both sides of the upper receiver and prevent the handguard from rotating once it's installed. Note that they are compatible only with upper receivers that have the standard contour in that area. The earlier billet Vltor MUR receiver pictured below is not compatible with the CMR, but the later forged ones are.
Installation - For this build, I used one of Centurion Arms' own barrels. This one is a 16", mid-length gas system, cold hammer forged mid weight contour barrel. It has M4 extended feed ramps, taper bore, and a 1:7 right hand twist with 5.56 chamber. The extra thick chrome lining provides a service life three times that of a standard M4 barrel. It's finished in mil-spec phosphate and weighs 1 lb 15 oz stripped. I had a Vltor GB-2S set screw mounted gas block on hand, and used it for this build. This Centurion Arms barrel came with one set screw dimple on the bottom, and I drilled the second one before finalizing the gas block installation. Fast forward: I had put this all together, and found that the bottom of the gas block contacted the inside of the CMR handguard. I took off the handguard and used a file to take off some material from the bottom of the gas block to provide clearance. If you're not using one of Centurion Arms' gas blocks, make sure you check the clearance when test-fitting the handguard. You have to start off with the gas block removed, obviously, to install the CMR barrel nut. The barrel nut is slid over the barrel, and the barrel extension inserted into the receiver. You can put some moly grease on the receiver threads and front of the barrel extension.
The CMR barrel nut is designed to be used with any kind of pin wrench that will fit. Two examples I've shown below are a bicycle bottom bracket spanner wrench, as well as the Multitasker tool with its carbine castle nut wrench. Finding a tool that would work was the toughest part of the installation. Old armorer wrenches with the pin for installing the old castle nuts will work as well. The barrel nut torque spec is a wide range of 30-80 ft lbs, and I just got mine 'good-n-tight'. There's no need to index the barrel nut, so that makes installation a breeze. Since the CMR handguard clamps around the barrel nut, and the anti-rotation tabs prevent the handguard from rotation, there's very little chance of the barrel nut loosening. All three screws in the handguard clamp would have to loosen before anything budged. To aid in getting the handguard top rail perfectly aligned with the upper receiver top rail (the anti-rotation tabs get it very close, but there's still a minute amount of play depending on the upper receiver tolerances), I used my handy-dandy rail clamp - an old ACOG scope base with thumb screws. I slid the CMR handguard onto the barrel nut, installed the clamp, then installed all three clamp screws and tightened them up.
For this build, I wanted an updated 'dissipator'-type configuration, which originally referred to a carbine-length gas system under a rifle-length handguard, with a fixed front sight base in front of the handguard. Some of the advantages (to me) are a longer sight radius, the front sight is fixed to the barrel, it's a 'clean' look, and it doesn't get in the way of any rail-mounted accessories like a rail-mounted front sight may. I've built uppers like this before, and like it quite a bit. For this build, I used the Vltor VST-2C clamp-on front sight/gas block. Mounted there, the gas block is non-functional of course - it's there only to provide a flip-up front sight. While it may be slightly heavier than a rail-mounted folding front sight, it actually weighs less than a standard A2 front sight tower. Note that a barrel diameter of at least .730" is needed for the Vltor VST-2C to clamp securely. The Vltor sight tower has positive spring detents to hold the sight tower in the down and up positions, and replicates the standard carbine 'F' base height, with extra elevation adjustment for longer sight radius installations. To install it, I used the same ACOG mount to clamp it in position, using the CMR top rail, then tightened the clamp screws. I finished off the upper with a Griffin Armament NT4 Compensator.
Mounting Accessories - Shown below is the INFORCE WML mounted at the 12 o'clock position on the top rail of the CMR. It can conceivably be mounted all the way forward, on top of the Vltor front sight tower, since the mounting position as far forward on the rail prevents the front sight from being flipped up without removing the light anyways, or it can be mounted a bit further back to allow the front sight tower to be flipped up. It all depends on your personal preference and needs. The direct-attach accessories that Centurion Arms will be offering in the future screw into the threaded holes in the hand guard. No plates or backing nuts are required. #8-32 screws are used, and local hardware stores should carry the most common lengths. Accessories will be available separately. Shown below is a pre-production accessory rail, which bolts to the CMR with two screws. Note that the accessory rail isn't a 'true' 1913 rail, as it's lower profile and does not have the .367" height that the spec calls out for. It's about .1" lower. This should not be an issue with most accessories, but I did find that it was too low for the original TangoDown Vertical Grip. The QD version however, worked fine. Most rail-mounted accessories don't utilize the full standoff height, and should work with the bolt-on rail. The rail is made from aluminum with a hard-anodized finish.
Shown below is a pre-production CMR Scout Mount, that is designed for mounting the SureFire Scout or Mini-Scout lights. The OEM Scout clamp is removed and the Scout attached to the CMR mount with two screws. The mount is made from aluminum with a hard-anodized finish, and is very light weight. The mount can be attached at 3 or 9 o'clock for left or right hand use, and places the Scout as close to the handguard as possible. With the mini-Scout mounted as shown, there is not enough clearance to mount a rail-mounted flip-up front sight beside it, so the front sight would have to be mounted behind the tail cap. This is one of the advantages of having the barrel-mounted front sight tower.
Centurion is eventually going to offer bolt-on rail panels for the CMR, but I decided to see if I could make some TangoDown SCAR rail panels fit the CMR. TangoDown rail panels are my favourites as they're grippy, low-profile, and don't have any ribs. To modify the SCAR panels, I first sawed off the rail grabbers on the back side of the panels. I also cut off the end with the rail lock on it, as that wasn't needed any more. I heated the two side panels and bent them slightly to match the curvature of the CMR hand guard. The bottom one didn't need to be re-curved as it overlapped the side panels. I then drilled holes into the panels after figuring out where I wanted them positioned on the CMR. I counter sunk the holes and got some 8-32 screws from the local hardware store and attached the panels. Even with the added thickness of the rail panels, the CMR is still much thinner than a quad rail handguard with rail panels. Since I was going saw-crazy, I also cut down a Bravo Company USA Vertical Grip and made it into a stubby.
Notes/Observations - Just like the Noveske NSR featured previously, the immediate impression When first handling a CMR-equipped rifle is how narrow/slim the handguard is, and also how smooth all the edges are. It's obvious that a lot of machining goes into one of these. Rather than going with slots or holes which can be used with mount-n-slot accessories, or Vltor's Keymod system, Centurion Arms went with their own direct-attach accessory system because it's simple and it uses minimal parts.
The ventilation holes on the bottom of the CMR are larger than those on top, but there's little danger of a stray finger poking through them to the hot barrel. Speaking of heat, I didn't find that the CMR heated up more than the Noveske NSR; the closest other handguard I have for comparison. All handguards will heat up, and the slimmer the handguard, the closer to the barrel the hand is. Both the NSR and CMR will be hot close to the barrel nut, but still 'holdable' without gloves near the end. Your mileage may vary of course, depending on ambient temperature, number of rounds fired etc. While I made it a point to shoot the CMR without gloves, I did only shoot it with my make-shift SCAR panels, which provided more than enough insulation. The handguard was definitely warm under them, and if I didn't have rail panels, I'd wear gloves. That goes for most handguards I've used - I either use rail panels or gloves when shooting. I kept the short section of accessory rail mounted on the bottom of the CMR as I used it to stick a grip-pod on there for zeroing, then later replaced it with my cut-down BCM vertical grip. After trying out various configurations; a bare handguard, handstop and various vertical grips, I do prefer a stubby/short vertical grip. I find it the most comfortable on my support hand wrist in just about all shooting positions. I'm really getting sold on the slim handguard idea vs. the quad rail, mainly because they're so much easier to wrap my hand around and control the muzzle. The CMR is well-designed and made, and I'm sure it will be a popular choice amongst shooters. 4/28/14 - Centurion Arms recently released their OEM CMR accessories, made of fiberglass-reinforced polymer. The material is light weight and also acts as a heat shield. They mount directly to the CMR with the supplied threaded fasteners, and are available in Flat Dark Earth (shown here) and Black. They fit both 5.56 and 7.62 CMR handguards. The accessories are available as an Accessory Pack, or as individual sets from Centurion Arms dealers. Rail covers - The polymer rail covers should probably be called 'handguard' covers as the CMR doesn't have integrated rails, but I digress. The covers come in a set of 3 and are 3.25" long and 1.125" wide, and only fit the CMR. They direct-attach to the CMR with two screws, and have a golf-ball dimple texture for a secure grip. The covers have semi-circular 'scallops' along the edges that correspond with the ventilation holes on the CMR; which are both functional and give them a distinctive look. A very nice touch is that score lines are molded into the back of the covers, which act as saw blade guides for cutting them shorter. 1913 Rail sections - The polymer reails sections come in long and short lengths. The long section is 3.625" long with 7 slots and the short section is 2.06" long with 3 slots. They attach with the same threaded fasteners to the CMR. The rails came out of the mold with a curve (not sure whether this was intentional), but they flatten out the moment they're installed. Note that like the aluminum prototype shown in the handguard writeup, the accessory rail isn't a 'true' 1913 rail, as it's lower profile and does not have the .367" height that the spec calls out for. It's about .1" lower. This should not be an issue with most accessories, but I did find that it was too low for the original TangoDown Vertical Grip. Scout mount - The Scout mount is of the same design as the aluminum prototype seen in the previous writeup above, except that it's solid and not skeletonized. The OEM Scout clamp is removed and the Scout attached to the CMR mount with two screws. The mount can be attached at 3 or 9 o'clock for left or right hand use, and places the Scout as close to the handguard as possible. Note that a rail-mounted front sight will have to be mounted aft of the Scout as it's so close to the rail. Hand stop - The hand stop secures with a single screw and has the same golf ball texture as the rail covers. It's simple and quite comfortable.
Shown below are the various accessories attached to the CMR. The handstop was the perfect 'gap filler' between the Scout and the rail cover, plus it may serve to protect the Scout from taking the brunt of a side impact if the weapon is dropped in its side. I used the short rail to mount my cut-down BCM vertical grip. The golf ball dimple textured rail covers don't add much to the diameter of the CMR handguard, and with covers on both sides, the width ends up being 1.85" across. Another plus is the very affordable price of all the polymer accessories.
At the range, the rail covers are comfortable, provide a good grip and are very effective at insulating the shooter's hand against heat.
|


BCM Standard Mid Length ELW Upper Receiver Group with KMR 13" Handguard
| 4/9/14 - Bravo Company USA is now offering their highly anticipated BCM ELW upper with KMR Handguard after months of teasing us with photos of them in the hands of well-known industry trainers. This upper features two new products from BCM - their KMR (Key Mod Rail) and ELW (Enhanced Light Weight) fluted barrel. Ever since Vltor made the KeyMod system Data Package available to the public, royalty-free, back in July of 2012; the KeyMod system has been gaining momentum as more and more manufacturers have jumped on board with both KM platforms and accessories. The KM System was developed by Eric Kincel, formerly of Vltor Weapon Systems and was first introduced as a collaboration with Noveske Rifleworks. The KM System offers a mounting platform for a variety of accessories and components. Eric left Vltor to join Bravo Company USA in January of 2013 as their director of R&D, so it's no wonder that the development of the BCM KMR (KeyMod Rail) has been watched with interest. General Description - As mentioned, in previous writeups above, the idea behind the KeyMod system is to get rid of the need for a secondary interface (rail) for attaching accessories. This allows KeyMod handguards to be light and narrow while offering a standardized interface for KM-compatible accessories and mounts. The addition of removable 1913 rail sections enables the use of legacy Picatinny-compatible accessories without the added weight and bulk of full-length rail sections as part of the handguard. Bravo Company USA offers a full line up of upper receiver groups featuring the new KMR handguard, and also offers the KMR handguard and other components separately. BCM Standard 14.5" Mid Length (ENHANCED Light Weight -*FLUTED*) Upper Receiver Group w/ BCM KMR 13" Handguard The upper receiver group as shown here features:
BCM KMR13 (KeyMod Free Float Handguard) - The BCM KMR13 handguard is manufactured from an exclusive blended aluminum and magnesium alloy, and weighs 30-40% less than aluminum with the same strength properties as 6061-T6. It also features a proprietary patent pending mounting, indexing and lock up system that mitigates 12:00 rail movement under heat generated from the barrel nut. The handguard itself is 'holy crap!' light weight at 5.5 oz - the lightest of its length so far that I know of. The mounting hardware adds 2.2 oz, for a total of 7.7 oz for the 13" handguard. The KMR handguard is available in 9", 10" 13" and 15" lengths. The 13" handguard actually measures 13.4" long on the sides. The top and bottom taper back to about 13.15". Width is approximately 1.52" and height from top of the rail to the bottom is about 1.975". Inside diamater is about 1.34". The KMR has an octagonal outside profile with seven flats to which KeyMod-compatible accessories can be mounted. There are 14 keyholes on the sides and bottom (3, 6 and 9 o'clock), and 15 keyholes at the 1:30, 4:30, 7:30 and 10:30 flats. The keyholes on adjacent flats are staggered for strength. There are additional cooling/vent/lightening holes along the sides of the top. According to BCM's website, the KMR has a propriety finish originally developed for the Aerospace industry. "It is a plasma deposition process which creates a stabilized ceramic-like surface coating with superior wear resistance when compared to anodize or even hard chrome. The stabilized nature of the coating means it has a higher corrosion resistance as well, due to the lack of ‘pores’ in the surface." More on this later. The KMR's finish is a non-glare, finely textured black.
Attachment system - The attachment system for the KMR handguard is pretty ingenious. The KMR uses a proprietary steel barrel nut and barrel nut wrench for installation. The handguard has what I believe is a transition fit over the barrel nut; it's toleranced such that it's tight and may require heating to slip over the barrel nut during installation. Rather than having a clamp at the bottom of the handguard, the KMR's clamp is located above the barrel nut. The clamping system is made up of two clamps that engage the grooves on the sides of the handguard rear. They're pulled together by two opposing screws which are installed through the two holes above the groove. One of the screws has a scalloped head, so that it's prevented from rotating by the end of the opposing screw. The two screws pass through the groove in the barrel nut.
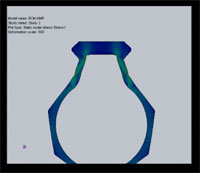
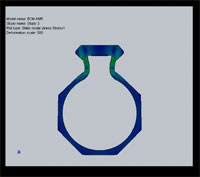
There's also index plate that installs onto the end of the handguard and engages the front of the upper receiver to prevent any rotation of the handguard. This requires no alteration to the upper receiver and works with all uppers that have a mil-spec profile in that area. Why is this system ingenious? It addresses the issue of an open-bottom clamp, that clamps around the barrel nut and tightens at the bottom. When a bottom clamp is tightened, it relies on the strength of the gas tube channel/top rail walls, which can deform or cause the clamp to loosen up as the barrel nut and handguard heat up from shooting. The same thing happens when the clamps are located on the sides, and the handguard has an upper and lower half that are clamped around the barrel nut. With the KMR system, the force is equally distributed around the barrel nut, like a hose clamp, while the top rail walls are not put under stress. The illustration below explains the clamping deformation in an open bottom (slot) clamp vs. the KMR's closed bottom top clamp. Click on the two thumbnails for video files which show how the top rail walls deform with an open bottom vs. closed bottom.
The KMR relies on a very tight fit over the barrel nut and slight deformation at the clamp to secure it around the barrel nut. It basically works like a hose clamp, tightening around a hose (the barrel nut). The index plate prevents any rotation of the handguard, and aligns the top rail of the handguard with the rail of the upper receiver. The handguard is prevented from moving forwards or back by the two cross bolts in the barrel nut groove, and the notched cross bolt will never loosen unless the locking bolt backs out. So, the genius behind this system is that the KMR handguard is basically prevented from rotating or slipping forward off the barrel nut without even tightening the cross bolts; which means that it cannot misalign or fall off due to losing torque in the clamp bolts, which some handguard rely solely on. Disassembly - As the upper was complete when I got it, and I disassembled it to show the individual components. The notched and locking cross bolts that tighten the clamps are easily removed with the clamps on each side of the handguard. The fit over the barrel nut was tight, so I use a nylon block against the rear edge of the handguard to slowly tap it forward with a plastic mallet. The handguard slipped off the front of the barrel. BCM Enhanced Light Weight (ELWF) fluted barrel with continuous taper and M4 feed ramps - This was one of the available features that I was pretty excited about. BCM's new ELW barrels are available in both fluted and non-fluted versions. The fluted version weighs about 0.5 oz less than the non-fluted version. The ELWF barrel (14.5") shown here tapers from the barrel nut to the gas block. The diameter at the gas block is 0.625", where a BCM Low Profile Gas Block (steel) is secured with set screws. The barrel has no shoulder to locate the gas block over the gas port, so the bottom of the barrel is dimpled to locate the gas block correctly. Forward of the gas block, the barrel steps down to 0.575" diameter, before the small flare behind the threaded portion. All this results in another 'holy crap!' light weight component - I can honestly say that I have not handled a more 'lively' upper of the same barrel length. ELW barrel weights are as follows:
I asked Eric Kincel to explain his reasoning behind the tapered barrel. Actually, this wasn't my first encounter with an AR-15 tapered barrel. Back in 2007, Eric had put together a midlength VIS for me with a barrel re-contoured to his specifications with a continuous taper. Eric wrote: "I’ve always been a proponent of tapered barrels, since day one. There’s a reason why for over 100 years, Match barrels have a continuous taper. Let’s just compare it to existing AR15 type barrels. The M16 and M4 barrels are all contoured poorly for accuracy. Those barrels are thicker in front of the gas block and way too thin under the handguard. Of course, the main reason both the M16 and M4 barrels are thicker in front of the gas block is so the barrels won’t bend as easy when soldiers use them to open crates. So, with that extra mass in front of the handguard and the barrel being thinner under the handguard, that thin area acts as a hinge or a flex point. This area flexes more as the barrel gets hotter. With the extra mass on the barrel, that mass becomes a whip, especially if the shooter is using muzzle device, like a compensator. Compensators don’t disperse gas equally, right? No, they force the muzzle down and maybe to the right or left, depending on what comp is used and if it’s directional or not. The hottest and highest pressure point is at the thinnest area of the barrel, just behind the gas block. In front of the gas block, you have unneeded mass and a directional rocket nozzle (compensator), pushing the muzzle down and/or other directions, acting as a whip! So much for accuracy.. BTW, the pressure from a pressurized Gas Tube doesn’t help either; more supplied down force on the muzzle. Now, seeing that everyone wants to have a free float set-up, which I totally agree with, the problems of whip is even more evident. So now you can understand why you want to keep the mass away from the muzzle and put it where the pressure and heat is, near the chamber." The BCM uppers are available with different muzzle device options, so I picked the BCMGunfighter Mod1 Compensator for permanent installation on the 14.5" barrel to bring it up to the 16" minimum length. Some of the manufacturer specs on the barrel are (paraphrased from the BCM website):
BCM M4 Upper Receiver Assembly - The upper receiver group came assembled with one of BCM's M4 upper receivers with laser T-Markings and M4 feed ramps. The difference between the one that comes with the groups and the one sold by itself is the white BCM logo on the one used for the group, right above the forward assist. Here's a summary of the features:
To further disassemble the upper receiver group, I used the BCM KMR Barrel Nut Wrench. It's made of 410 Stainless steel and has three 'teeth' that engage the notches on the barrel nut. It just so happens that they're the same dimensions as those found on the M4 receiver extension castle nut, so the wrench will do double-duty. The wrench has a 1/2" drive hole. I loosened the barrel nut and removed the barrel (after removing the gas tube first). BCM uses white lithium grease on the threads of the barrel nut, which is what you see in the photos below.
I disassembled the upper receiver group not only to check out the individual components and go through the assembly/installation process myself, but also to swap out the BCM upper receiver with a Vltor MUR (Modular Upper Receiver). The main reason I prefer the Vltor MUR over a standard upper receiver is because I'm left-handed, and the forward assist on the MUR is positioned further forward than on a standard upper. When using an ambidextrous charging handle, this gives my fingers more clearance on the right side of the charging handle. To re-assemble the barrel and KMR, I followed the KMR Installation instructions. I essentially installed everything in the reverse order I took it apart. The barrel nut doesn't need to be timed; just torqued to spec. Note that if the barrel nut wrench slips and mars or deforms the notches on the barrel nut, the raised burrs need to be filed down to allow the handguard to slip onto the barrel nut. For new installs, BCM recommends the use of heat on the rear end of the KMR handguard to aid in installation over the barrel nut since it's a transition fit, and the handguard is supposed to fit tightly onto the barrel nut. I didn't have to use any heat, and I also installed the index plate to the handguard first, rather than the receiver. To line up the handguard with the upper, I tapped it lightly to rotate it on the barrel nut with a plastic mallet. Note that care needs to be taken as you get close to the receiver. The handguard is not meant to be seated against the front of the receiver - there's supposed to be a very slight gap. The cross bolt holes are visually aligned with the barrel nut groove, then the cross bolts installed per the instructions. Everything went together smoothly for me - it was a very straightfoward installation. Shown below is the assembled MUR upper with ELW barrel and KMR handguard.
KeyMod Accessories - The Upper Receiver Group came with two KeyMod Polymer Picatinny Rail Sections - one 4" (7 slot) section and one 3" (5-slot) section. The rail sections are made of light weight impact-resistant polymer, with corrosion-resistant stainless steel mounting hardware. They're available in black (shown here), flat dark earth and foliage green. They're also available in 5.5-inch lengths (11 slot). The front and rears of the sections are angled to reduce snagging and for comfort. You can see that the angle provides a much more comfortable transition to the handguard for the vertical grip than a square-cut edge. The rail sections obviously cannot be utilized at the 10:30 and 1:30 positions on the handguard as there would be no clearance for a rail clamp. They can, however, be installed onto the five other handguard flats. Illustrated below is the Noveske QD Direct Attach Swivel Mount, installed in two positions on the KMR. It'll also install on the upper flats, but I prefer the sling to be installed on the side at 3 o'clock (for a lefty). On the QD sling mount, there are two mounting screws, each with a captured accessory nut. The nut is flat on two sides, which prevents it from rotating. The nut has tapers which match the chamfer on the back of the keyholes in the handguard. This makes them self-centering, and prevents any up or downward movement of the accessory on the rail. To install the sling mount, the screws are loosened and the nuts passed through the rear of the keyholes. The mount is then slid forward, and a small counter-recoil lug on the front hooks into the keyhole in front of the mount, preventing it from moving backwards. The screws are then tightened. The QD sling swivel mount is rotation limited so that the swivel doesn't rotate.
Also illustrated below is the Noveske TRX/NSR Sling Stud/Bipod Mount. It's designed for the Troy TRX-E and NSR handguards. It'll also work with keymod handguards. There's a stud, round insert and a rectangular threaded plate. The round insert fits into the keymod hole, the stud install and engages the threaded plate, which is slipped inside the handguard. I found that the plate worked better with the flat part facing the handguard vs. the small step.
Using the Sling stud/bipod mount means that you don't have to install a rail on the bottom of the handguard, and you don't need a bipod rail mount. This saves weight, and also mounts the bipod directly up against the bottom of the handguard. It's lighter and more compact.
8/28/14 - The BCM KMSM (Keymod Quick Detachable Sling Mount) is probably the lowest profile handguard-mounted mount I've come across for standard push button QD sling swivels. It fits standard KeyMod interface mounting holes and is of all steel construction. It's very low profile and has beveled edges to decrease any snag potential. It attaches to a KeyMod interface with two left-handed mounting screws, which actually move outwards as they're tightened, instead of in. I thought that it was pretty ingenious to use single left-handed screws instead of the normal Keymod nut and screw, which would have made it more bulky. To install the mount, the screws are loosened and the mount oriented in the correct position. An arrow marking on the back of the mount indicates the correct direction of the mount. With the supplied Torx wrench, the assembly is dropped in and slid forward and secured at the desired mounting position on the handguard. The screws are then tightened (clockwise) until firm. The inside of the QD mounting hole is scalloped so that there are 8 positions. The swivel does not rotate in the mount. AS you can see below, the KMSM protrudes very little from the handguard, and is unobtrusive when not in use. I didn't think that I could be impressed anymore by a simple QD sling mount until I saw this one.
Notes/Observations - The first thing I noticed when I picked up the upper was how light it is with the KMR and ELW barrel. It's most definitely the lightest and most lively-feeling upper I've had. As far as handguard feel goes, out of all my other handguards, the only other one close enough to compare is the Noveske NSR as their shape and dimensions are similar. The outer width of the NSR and KMR differ only by about 0.04" and the heights are within 0.025", with the NSR being the thinner/shorter one of the two. They're both very slim, with the KMR having an approximately 4 oz weight advantage over the NSR. I really do like having the option to mount KeyMod accessories on all seven flats of the handguard, even if I may not take advantage of it. It makes sense for cooling/vent holes to do double-duty as accessory attachment points as well. One thing that I did notice was that the black finish on the KMR handguard is subject to wearing off on the sharp edges. On the forums, other had mentioned the same thing. The proprietary finish that BCM mentions on the website is actually the layer beneath the black finish, not the black finish itself. The standard aluminum anodizing process cannot be used on the aluminum-magnesium alloy, so the protective finish is applied using a plasma deposition process. The actual colour is whitish-grey. This is what is seen when the black finish is scraped off, not the bare metal. So, even if the black finish is compromised, the metal is still protected from corrosion. Expect to see some wear on edges that are exposed to friction or wear, like the sides of the rails and edges of the keyholes, when mounting and dismounting accessories. While this is just a cosmetic issue, not a functional one, and some customers may mind and some may not; I'd still like to see BCM figure out a more durable top layer to cover all customer bases. The weight of the rifle as pictured on AX556 lower is 6.2 lbs, and the AX556 isn't a light weight lower receiver. One thing I found out was that you need to ensure that any optic mount attached to the upper receiver rail does not come into contact with the index plate. I was wondering why my Aimpoint T-1 was maxed out in elevation then discovered that the mount was making contact with the index plate and the mount wasn't seated properly. I moved it back one position and it was fine. The LaRue SPR-S mount clears the index plate when mounted as shown below. On a recent outing to the desert, I brought the KMR upper along with me to sight in. I sighted in the Aimpoint T-1 as well as a Nightforce NXS 2.5-10x24 scope, which I used to shoot the group shown below. All 10 shots are within the 2" diameter circle, using prvi partizan PPU Match HP BT 75 gr ammo. The rifle was on a Harris bipod. It was in the heat of the day and I had some trouble with the boiling mirage, but I was pretty happy with how the ELW barrel performed. I'm sure that a better shooter shooting off a better rest on a bench would tighten that up a bit.
Shooting the upper at closer ranges from different positions made its light weight even more apparent as the front end is so easy to move around. There are pros and cons to this, as a lighter weight rifle will have more felt recoil and possible more movement at the muzzle than a heavier one. I didn't notice a big different in felt recoil between the KMR/ELW barreled upper and my heavier uppers, based on memory. It was pleasant to shoot with the Vltor A5 buffer on the AXTS lower, and the BCM Mod 1 Comp most likely helped reduce muzzle jump. I put about 350 rounds through it with assorted ammo, including Wolf, M193 and commercial .223 without any hiccups. Ejection pattern was about 3-4 o'clock. Another thing I noticed was that the KMR didn't feel as hot as other aluminum handguards after a couple of magazine dumps - not sure whether it's because of the magnesium/aluminum alloy. I went for a short hike around the hills wearing an Arc'teryx DryPack 70, and brought along the rifle with me. I really appreciated the light weight rifle, which shaved a couple of pounds off my other uppers with heavier barrels and rail systems. If I had to carry one rifle where I had to move or travel, I think this would be it. |


ATTENTION! PLEASE DO NOT LINK DIRECTLY TO MY IMAGES
-
IT RESULTS IN MY BANDWIDTH ALLOCATIONS BEING EXCEEDED,
AND MY PAGES GO DOWN. THANKS!
/ . PLEASE
OBSERVE AND RESPECT OUR COPYRIGHT! . /
©opyright by MilitaryMorons.com. All Rights Reserved. Reproduction, Duplication,
Distribution Strictly Prohibited.
Unless mentioned otherwise, content and images are the
property of militarymorons.com and are not in the public domain.
They are not to be used without
permission. Please Contact
me for permission to use any images or content herein.