Blades Page 1 Page 2 Page 3 Page 4
TO VIEW FULL SIZE IMAGES: USERNAME and PASSWORD are both "mm"
Triple Eight (888) Professional Knives
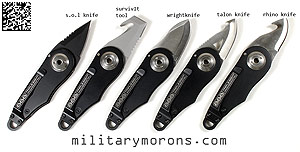
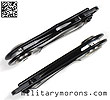
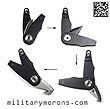
12/8/10 - Not much longer than a car key when closed, the diminutive knives from Triple Eight Professional are designed as every day carry tools that will be there when you need them. They feature an innovative chassis and patent pending T8P 'Spinner Action' which Triple Eight refers to them with the oxymoronic-sounding term 'folding fixed blade knives'. Design Concept and the T8P Spinner Action - The concept of a 'folding fixed blade knife', as explained by Walter Kaihatu from 888 Professional in relation to their knives, came from the desire to offer something that was very small and compact, but very strong laterally (for prying) and had a very tight lockup. The design they came up with features a two-piece handle and blade, rotating around a large axle/pivot. There's a 'top' handle and a 'bottom' handle (the one with the clip). Both are made of 420 stainless steel which was chosen to ensure that the chassis itself is very strong, and that when deployed, the blade and handle work together as a single unit. Each handle has a pin pressed into it, which serves as blade stops on either side, in both the closed and deployed positions. The 'Spinner Action' features a latching feature at the top portion of the handle near the lanyard loop. A small spring loaded ball bearing in the bottom handle keeps the top handle in place by means of a small detent. To open the knife, the top handle unlatches and rotates, taking the blade with it as the stop pin contacts the blade. It rotates 360°, while the blade locks at 180°. The top handle latches again to the bottom handle, once it has rotated the full 360°. Once latched, the blade is locked in the deployed position without any play or movement whatsoever, and mimics a stout fixed blade knife. The blade cannot move unless the handles are unlatched. The five models of Triple Eight Professional Knives shown here are available from U.S. Cavalry. The Kirkidashi model which has a damascus steel blade, is not shown here. Here's a summary of the main features/specs of the 888 Professional Knives (applies to all 5 models):
|
|
Models - Triple Eight Professional partnered with well known custom knife smiths on their designs who brought their expertise to the table to design six different models; five of which are shown here. S.O.L. knife - The S.O.L. (s**t out of luck) knife was designed by master knife smith Kirk Rexroat, and is based on the famous WWII OSS thumb daggers which were meant as last-ditch weapons, and were sometimes concealed with their sheaths sewn into clothing. The S.O.L. knife has a triangular, blackened, double-edged 1.25" blade with partial serrations along one edge. It has a very sharp point, and though small in size, is nothing to laugh at if you're on the receiving end. The S.O.L. does not have any thumb serrations behind the cutting edges, and this is probably because this knife is best used with the thumb on the pivot stud to prevent it from slipping forward if the blade hits something solid. Survivit tool - The Survivit tool was designed by retired police officer Roy Huntington, who has written about knives for over 20 years and is the editor of American Handgunner magazine. Roy brought 24 years of real world police experience and designed the survivit tool with a seat-belt/line cutter, prying scraping blade, and a serious serrated cutting edge. The seat-belt cutter hook is ground on both sides, and will cut through webbing or cord with ease. The back of the blade has a small serrated thumb rest (jimping). The Survivit Tool has a non-glare bead blasted finish. Wrightknife - The Wrightknife was also designed by Kirk Rexroat, and named after Weight, Wyoming, where Kirk lives with his family. The Wrightknife is 888's most 'conventional' blade design, with a a lot of belly and a false top edge. It's a stubby, sturdy blade that looks like it'll also withstand some prying. The Rhino blade has a brushed stainless finish. Rhino knife - The Rhino knife, also designed by Kirk Rexroat, is aimed at the hunter and outdoorsman, and has the sweeping cutting edge of a skinner and detail cutter, with a double-ground gut hook. The gut hook can double as a seat-belt or cord cutter. There are serrations on the top and bottom of the blade just forward of the handle, to aid in 'choking up' on the blade for detail work, or when using the blade hook-side down. The full-bellied blade has a brushed stainless finish. While the Rhino was designed as a skinning/caping knife for small to medium game, 888 says that the Rhino knife can tackle a full-sized deer if you need it t. I'll just have to take their word for it, as my uses for it are much more mundane. Talon knife - The Talon knife looks very similar to the Rhino knife at first glance, but the difference is in the details (I think it's actually closer in profile to the Wrightknife). It's designed by Greg Lightfoot, who hails from Alberta, Canada. It's his take on a modern mini survival or EDC knife. The full-bellied, main cutting edge is pretty much identical to that of the Wrightknife, while the spine of the blade incorporates a small single-ground line cutter. The spine has jimping on it forward of the handle that serves as a thumb rest. A lightning hole makes it feel a tad lighter than the other blades (except for the S.O.L.)
Notes/Observations - The 888 Professional knives may be small, but it'd be a mistake to discount the utility of their 1.25" blades. Care must also be taken by the user when handling them, as the blades are sharp and it's possible to get into trouble is your hand strays too far forward. Each model has some sort of jimping (serrations) on the spine as a tactile index for the thumb or index finger; they should not be placed forward of the jimping. With the thumb placed on the jimping, a lot of cutting force can be put behind the blade. For some of the knives, like the Wrightknife, Rhino and Talon, the jimping is a good place for the index finger when using the knives to cut like an X-acto blade. The knives can also be held with the thumb placed on top of the pivot point. I found that this method is what I felt safest with when using the S.O.L. model, which has a very sharp double-edged blade, and no jimping. I have small hands, and I'm usually able to get three fingers around the handle; the pinky finger doesn't make it. Handling the 888 knives vs. a full sized handle can be likened to shooting a compact glock 26 vs a 19 or 17. It's still very do-able. The knives are really designed for two-handed opening. The tension in the axis/pivot is factory adjusted so that the handles must be deliberately rotated. This was also done for overseas customers where knife laws require two hand opening knives. I found that the tension varied a bit across the models; some were tighter, some were looser. None were loose enough to open by flicking. The tension is not meant to be user adjustable. It's possible, however, to open these knives with one hand. I found that the best way for me was to hold it with the lanyard hole up, unlatch the handle and push it open about 45°, then place the end against an object, like a table and use it to rotate the handle into the open position. I'm also able to do it with one hand without the aid of another object, but it requires some manipulation that I don't feel entirely safe with. If you have two hands available, use them. It's the fastest and safest way to get the knives open. One other thing I would like to see changed is the tension in the slim line clip increased. The clips is relatively smooth, and the handles are also smooth, unlike most other knives with rely on handle/scale grip texturing to aid in keeping them clipped into a pocket. Clip tension was also slightly different between knives; some were tighter than others. Since the stainless steel material used for the clip is thinner than most knife pocket clips, there's only so much tension it can provide. It's also narrower than most clips. I tried the knives on a variety of garments, and while there's enough tension in the clip to hold them to thicker materials like jeans and some tactical pants, they still slide out a bit too easily. I found the clip tension a bit light to clip the knives to thin fabrics like dress shirts, like 888 has mentioned. While it would hold the knife there, I prefer just a bit more security and less chance of accidental loss. I'd like to see the width of the clip increased - it can easily be doubled, which will provide more contact area to grip with, without changing the material thickness or bends. The 888 knives are small enough to carry just about anywhere. Obvious places to carry them are in the small coin pocket on your jeans, right behing a thin belt on your waist, in your pocket, behind a ID badge at work, on a keychain etc. They're also small enough that they don't come with the stigma that larger blades have. In other words, they don't scare the sheep. I've been roating through the various models over the past couple of months, and it's really hard to pick out a favourite as they all have different purposes, especially the S.O.L. and Survivit. For everyday utility, I'd probably pick the Talon and Rhino over the Wrightknife, for the added utility of the hooks/line cutter. I used the gut hook on both the Survivit and Rhino to cut a lot of plastic zip ties. The prying edge on the Survivit is works great for paint cans, as does the false edge on the Wrightknife. The short, stubby blade of the Wrightknife feels sturdy enough to use for some prying tasks without making contact with the cutting edge. On most days, I carried two or three models, for the purposes of using them and also because they're so small and light that they're really unnoticeable until you need them. The funny thing about it is that while I used the S.O.L. for fewer everyday tasks than I did the other models, I always carried the S.O.L. with me, no matter which of the other ones I rotated. The S.O.L. is the only one which is really designed as a weapon vs. a tool, and while I'm not sure how quickly I can deploy it in a defensive situation, it made me feel better just having it on me (as opposed to not having anything at all). One of the important things about owning knives is to have a knife when you need it, and given the size and weight of the 888 Professional knives, it makes it very easy to carry one on your person. The possible places to carry these things is endless, and they're affordable enough where two or three won't break the bank. Lots of utility stuffed into little packages - that's what these are.
|
Bawidamann Blades Pals Universal Platform (PUP)
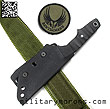
12/15/10 - The PUP (Pals Universal Platform) from Bawidamann Blades is a rugged, adjustable MOLLE/PALS platform solution for kydex knife sheaths, small magazines, lights and other items that is compatible with many retention systems and all MOLLE/PALS webbing. Bawidamann Blades (BB) is a relatively new name in the custom knife arena, but the Bawidamann name should be familiar to visitors to my site or fans of Andrew Bawidamann's pin-up art. Bawidamann Blades is made up of Ben and Andrew, and their father Joe. Andrew, as many of you might know, designed my Military Morons T-shirt and Patch. The PUPs are currently available from the bawidamann.com web store. Design Concept - The PUP concept was developed because of the lack of options for attaching kydex knife sheaths to molle gear and rigs. Malice clips can be used in some instances, as can the Blade-tech Tek-Lok, but they're less than optimal solutions. Since BB was making custom knives and kydex sheaths, it made sense to develop their own mounting platform to cover their customers' potential needs. The PUP was thus born. The PUP is a .093" thick kydex sheet that is drilled with a grid of holes, where chicago screws can be located to secure a kydex knife sheath to the platform. The PUP comes in two models - standard and mini (which comes as a pair). The standard model has two kydex 'straps' while the mini model has one. Each PUP comes with all mounting hardware and a hex key. Here's a summary of the main features/specs of the PUPs:
|
|
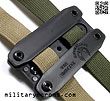
Standard PUP - The Standard PUP has six eyelets and a grid pattern of 17 holes. The two straps are riveted at the top corners of the platform, and rotate out of the way so that the chicago screw backer nuts (or 'posts') can be inserted from behind. A spacer is sandwiched between the platform and the straps, that provides the necessary clearance for backer nuts or webbing. There are eyelets in the middle and at the bottom, through which screws and nuts are used to secure the platform to the webbing. The Standard PUP comes with 9 screws, 7 black backer nuts, three long (silver) backer nuts, three rubber spacers and a hex wrench. Normally, you'd only use two rubber spacers and 4-6 black backer nuts, but BB includes extra hardware in case any are lost. The black backer nuts are used for the eyelets, and the longer silver backer nuts are used with the rubber spacers. The rubber spacers provide stand-off distance needed with most kydex sheaths. The distance/spacing between the holes are as follows: main grid pattern: 0.75" vertical and horizontal spacing. Spacing between holes along the 45° line is .55". Corner eyelets to nearest vertical hole is 1". Center eyelets to nearest vertical hole is 0.75". The spacing will vary depending on the angle that is swept. Many knife sheath I've seen follow a standard eyelet spacing of 0.75", 1" or 1.5". To use the PUP, you first figure out what orientation you want the sheath to be. If the eyelets on the sheath don't line up with the holes on the PUP, then the sheath probably doesn't use the standard spacing. When you find two or more eyelets lining up, then install the silver backer nuts and rubber spacers in the corresponding holes on the PUP platform. The eyelets on the PUP can also be used, but without the rubber spacers as the silver nuts will be too short. The PUP is then attached to the PALS webbing on a rig or belt, and the black backer nuts and screws are installed in the bottom eyelets to lock the PUP to the rig. The sheath is then attached to the silver backer nuts using black screws. Mini PUP - The Mini PUPs are sold in pairs and each of them comes with 2 rubber spacers and silver backer nuts, 3 black backer nuts and 5 black screws (so double the number for the pack of two mini PUPs). An allen wrench is also provided. The grid spacing and pattern is the same as on the standard PUP, but with 10 holes instead of 17. The strap is riveted in one corner, and allowed to rotate around that eyelet. A backer screw and nut is installed in the other hole in the corner and also the bottom eyelet when locking the Mini PUP to a platform. The Mini PUPs can be used individually, for lighter items, or in pairs. They're particularly useful when the item to be mounted doesn't match the standard grid pattern on the Standard PUP. The distance between the Mini PUPs can be varied a bit, or mounted further apart on non-adjacent columns of PALS, so they offer more flexibility if needed. Notes/Observations - The PUPs are very easy to install, and once done, provide solid platforms on PALS webbing. Bear in mind that they're only as stable as the rig they're mounted to. The PUPs are both well made and designed, with the only drawback being that they require a single hex key to take apart. Chicago screws are very common in the knife business, but in the past, I've had trouble taking them apart since the posts are round, with no provisions for tools. Sometimes, you'll try to remove a screw and the post/backer nut will just spin. I once had a knife sheath mounted to a Tek-lok using the supplied chicago screws which I could not take apart, even though I had not used any loctite. I ended up having to use a dremel tool to cut a screw slot in the back of the post (backer nut) so I could use a flat head screw driver opposite the hex key to take it apart. Since then, I've been very wary of overtightening chicago screws. Bawidamann recommends that blue loctite be used for installation, but beware that you might have a hard time taking the assembly apart afterwards. What I've started doing is putting two flats on the posts with a dremel (see photo below). It only takes about 30 seconds for each flat, and it enables me to get a small adjustable wrench on it, or pliers, and makes disassembly much easier if a screw happens to be stuck. A few minutes now saves time and frustration later on. I wish all chicago screw posts came this way. Another simple alternative is just to glue the backer nut to the PUP platform, since it always needs to be used. I did this with some rubber weatherstrip cement and it's worked very well so far. While the PUPs are not designed to be used with a belt, it's possible to use them that way. Note that the PUP is essentially a 3" belt loop, so there'll be some play in the slot unless a spacer is fabricated. Shown below are a couple of the many configurations possible with both the standard and mini PUPs. The knife on the belt is a prototype Bawidamann Blades Skraeling, which is the forerunner of an upcoming BB/MM collaboration. As illustrated below, the mini PUP can be spaced across more than two columns of PALS, and they don't even have to be on the same row. There are a lot of potential uses for the PUPs, as low profile and light weight mounting systems for kydex magazine pouches, tool pouches etc. American ingenuity at its best!
|
| I know that someone's going to ask "Can you mount a Safariland holster to the PUP?", so I tried this out myself. It's possible, but not without drilling a couple of new holes. An ALS holster without a shroud works best, as it's mounted lower than one with a shroud. I drilled some new holes in the standard PUP and mounted an ALS holster to it, then mounted the assembly to my Crye belt, as shown below. It works, but here are some minor changes that would make the PUP better for Safariland ALS holster mounting, and it'd be nice if Bawidamann could offer it as an additional product. I've provided some feedback to BB, so hopefully they'll be able to make up a prototype to try out sometime in the near future. I think it has potential in this role, as it mounts the holster lower than if the Safariland molle adapter was used.
|
Bawidamann Blades Blank Pals Universal Platform (PUP)
4/4/11 - The Blank PUPs from Bawidamann Blades is their PUP (Pals Universal Platform) without the grid pattern of holes drilled in it. This allows the user to drill his own holes if whatever he's mounting doesn't have the standard hole spacing. As mentioned above, the PUP (Pals Universal Platform) from Bawidamann Blades is a rugged, adjustable MOLLE/PALS platform solution for kydex knife sheaths, small magazines, lights and other items that is compatible with many retention systems and all MOLLE/PALS webbing. The Blank PUPs come in both the Blank Standard PUP Set and Blank 2 Mini PUP set (the Mini's come sold in pairs), and have exactly the same hardware as the regular PUPs, just without the holes pre-drilled into the platforms.
|
|
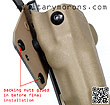
Ever since I mounted a Safariland ALS holster to the standard PUP, Bawidamann was interested in seeing how it worked. He made an extended platform for me to try out; it was a standard PUP with and extra inch of length at the bottom. I wanted it longer so I could mount the holster a bit lower. However, I found out that there's a limit to how low I could mount it because there needs to be clearance between the ALS thumb lever and the top of the PUP. Mounting it this way still allows it to ride lower than Safariland's MOLLE Locking System, and is more stable. After experimenting with the Standard PUP and prototype, we decided that the Standard PUP size worked well without any changes. I've been using my Safariland 6378 mounted on a Standard PUP for a few months, and it's worked well enough to validate the concept. Not everyone uses the same eyelet spacing on their knife sheaths or holsters, and they may not always line up with the grid pattern on the PUPs. Or, the angle at which you want to mount a sheath at may not line up exactly with the grid pattern. It made sense to offer both the Standard and Mini PUPs in blank configurations for do-it-yourselfers. With the Blank PUPs, all the user has to do is determine where the holes need to be located, then drill them. It's very easy to do, and anyone with the slightest mechanical inclination should be able to do it. My main purpose for the Blank Standard PUP was to mount my Safariland ALS holster to it. Other holster types can be mounted in a similar fashion, or use two Blank Mini PUPs if they have eyelets on both sizes. Tips for mounting an ALS holster to the PUP - Note that the PUP works well for an ALS holster, but is not suited to those with the SLS hood. This is because the mounting pattern for the SLS hood-equipped holsters is lower than the ALS-only ones, to provide space for the SLS mechanism. The lower mounting pattern places the pistol too high to be stable. The Safariland 6378 is my favourite holster to use with my Glocks, so here is what I did to mount it to the Blank Standard PUP:
As you can see below, the PUP makes for a very low profile mounting platform for the holster. Mounted to my Crye belt, it's not as high as it was with the MLS and easier to draw from. It's stable, as long as the MOLLE platform to which it's mounted is. I haven't used the Blank Mini PUPs yet (I'm saving them for something else), but you get the idea. I think that the Blank PUPs are a great way to custom mount holsters or sheaths to MOLLE gear, if the item doesn't match the standard grid pattern of holes on the Standard PUPs.
|
Bawidamann Blades Pals Universal Platform (PUP) - update
7/20/12 - The PUP (Pals Universal Platform) from Bawidamann Blades has been updated. Rather than the kydex construction of the original PUPs, the new PUPs are molded from super tough ST801 nylon. The molded nylon PUPs duplicate the original kydex versions in just about every aspect, including the textured outer surface. All holes spacings and overall dimensions are the same. Please refer to my writeup above of the original PUPs for all the details. The original PUPs were made from three layers of flat kydex - the platform, a spacer and the straps. With the molded PUPs, the spacer has been incorporated into the front platform. The Bawidamann Blades logo is molded into the straps. The originals had no markings at all. Mini PUP - The Mini PUP is available with or without holes (blank). Shown below are the new molded PUPs, and in the last two photos, a comparison to the original kydex ones. The strap on the molded PUP is just slightly thicker than the kydex one, and the main platform on the molded one has a ridge around its perimeter, where the kydex one was flat. The ridge helps create a space behind the platform for hardware and also adds rigidity over the flat kydex. The Mini PUP sets come with two mini PUPs and the hardware shown below. Standard PUP - The Standard PUP is available with or without holes (blank). Shown below are the new molded PUPs, and in the last photo, a comparison to the original kydex one. The straps on the standard PUPs are slightly different than the ones on the mini PUPs - they have a small step along the edges. Also, you might notice that the middle hole on the straps of the original PUP has been deleted on the molded PUP strap. This is because that hole was very seldom used. You can always drill one through the strap if you need one there. The main platform on the molded one has a ridge around its perimeter, for the same reasons as on the mini. The Standard PUP sets come with one platform and the hardware shown below. I've been using the PUPs as my platform for mounting kydex holsters to both my 2" wide EMDOM CM belts and to molle battle belts over the past year and a half. They've been both stable and secure, and very low profile. |
Bawidamann Blades Modular PUPs
12/18/13 - Bawidamann Blades has introduced their new Modular PUP (PALS Universal Platform) sets in addition to the original PUPs. Like the originals, the Modular PUPs are available as a pair of Mini PUPs or the Standard PUP, molded from super tough ST801 nylon. Note that these do not replace the original molded PUPs; they're offered in addition to the original PUPs. The main difference between the original molded PUPs and the new Modular PUPs is that the Modular PUPs are not riveted together. Also, a new hardware kit is supplied that enables the end user to assemble them such that they can accommodate thicker belts using spacers, and also to retain them more securely on belt or MOLLE platforms. The new post-nuts now have flat tip screwdriver slots in the back, which enable them to be tightened or loosened with a fat tip screwdriver. No more rotating post-nuts when using loc-tite! The new hardware kit also includes 1/8" thick rubber washers/spacers in addition to the 1/4" spacers. In this article, when I refer to the 'original PUPs', I'm referring to the current/previous molded version seen in the writeup immediately above, not the original kydex ones. Modular Mini PUP Set - The Modular 2 Mini PUP set is currently available only with the pre-drilled holes. The Modular PUPs come with the front plate and rear strap as separate pieces. The original mini PUP has one hole riveted with an eyelet so that the strap pivots around it. The modular Mini PUPs come with a rivet 'sleeve' that takes the place of the rivet and fits into the larger of the two holes at the top of the strap. The new 1/8" rubber spacers can be mounted behind the strap, or between the strap and front plate to create a 1/8" gap for thicker belts. A 1/8" rubber spacer can also be used to secure the Mini PUP on 1"-3" belts or MOLLE webbing - more on that below. Modular Standard PUP Set - Like the Mini PUP set, the Standard PUP Modular Belt Molle Unit is currently available only with the pre-drilled holes, and comes with the front plate and rear straps as separate pieces. The rivet 'sleeves' are used to assemble the two straps to the front plate. The 1/8" rubber spacers can be mounted between the strap and front plate to create a 1/8" gap for thicker belts. Shown below are the rubber spacers being used as stops, for belt mounting or molle mounting. The user finds the hole to place the spacers such that the PUP is prevented from moving on the belt excessively. In the case of the MOLLE configuration, the 'brakes' are placed such that they grab the webbing, rather than being used as stops between the webbing. This distributes the weight between the two rows of webbing, rather than having all the weight bear on the top row, which is the case when no spacers are used. The rubber spacers widen out when compressed, so that tension can be adjusted when used on belts. Hardware kit - If you have an original PUP and would like to update the hardware, an Additional PUP Hardware Kit is available that contains 10 screws, 6 1/4" post nuts, 4 3/8" post nuts, 4 1/4" rubber spaces and 4 1/8" rubber spacers. The post nuts now have slots on them to facilitate assembly and removal with a screwdriver. Shown below are the mini and standard PUPs configured for use on MOLLE platforms. The mini PUP positions the brake such that it's between the two horizontal rows of MOLLE webbing. Only a 1/8" spacer is used on the mini PUP. A 1/4" spacer or two 1/8" spacers are used as molle brakes for the standard PUP. Notes/Observations - I've been using the various versions of the PUPs for three years now, and prefer them to anything else for mounting holsters to my belt, whether it's a MOLLE-compatible belt or my EMDOM CM belt. They're low profile and very secure. By mounting the G-code RTI wheel to a pair of mini PUPs (the standard PUP is not wide enough), then to my belts, I can swap out holsters in seconds. I sometimes bring more than one handgun to the range, so the RTI wheel makes it super-convenient to swap them out. I use G-Code holsters, and also have the RTI hangers on my Safariland and other kydex holsters like the OTGs shown below. The PUPs are very secure on my belts, and don't move up or down when I draw the handgun. The new modular PUPs improve upon the original ones by offering even more options for the user. |
ATTENTION! PLEASE DO NOT LINK DIRECTLY TO MY IMAGES
-
IT RESULTS IN MY BANDWIDTH ALLOCATIONS BEING EXCEEDED,
AND MY PAGES GO DOWN. THANKS!
/ . PLEASE
OBSERVE AND RESPECT OUR COPYRIGHT! . /
©opyright by MilitaryMorons.com. All Rights Reserved. Reproduction, Duplication,
Distribution Strictly Prohibited.
Unless mentioned otherwise, content and images are the
property of militarymorons.com and are not in the public domain.
They are not to be used without
permission. Please Contact
me for permission to use any images or content herein.
