Proper
pack setup can make a world of difference in comfort. To new Kifaru
users, how the different straps and possible adjustments are supposed
to be used and set up can be quite a mystery; they were to me when
I got my first Kifaru pack. Using the adjustments the way they were
designed can make a world of difference in how comfortable the load
is carried. When I got my first Kifaru pack years ago, I asked Mel
Terkla what the recommended way of setting up the Kifaru packs was,
and his preferred sequence of donning the packs. Since then, I've
seen many customers ask the same questions, so I decided to put together
this little guide, based on Mel's recommendations and guidance.
Everyone has a different
physique - tall, short, thin, fat etc, and Kifaru also has different
suspension systems. Getting the pack set up right (for you) will require
tweaking, and miles under the belt to figure out what works best.
It's also based partly on personal preference. But following the recommended
initial setup will get you started in the right direction.
|
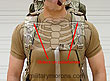
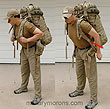
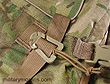
Nomenclature
The photos to the left show the main straps and adjustments
common to all Kifaru packs.
- Shoulder straps
- Lifter straps (on shoulder straps)
- Sternum strap
- Hip/Waist belt
- Upper delta strap
- Lower delta strap
Note that the shoulder strap is meant to pass UNDER/BEHIND
the upper delta strap. I wasn't aware of this until recently
as it can be set up both ways. On the Omni suspension system,
it's probably not as important as there the packs are all relatively
narrow, but on the larger packs, it's more important.
|
|
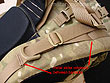
Hip belt
position
All of Kifaru's packs have a suspension system that puts much
of the load on to the hips. For that reason, the term 'waist
belt' might be misleading. For packs with no suspension system,
the waist belt is there to stabilize the pack during movement,
not to offload the weight from the shoulders. The Kifaru waist
belt is meant to be centered on the hip bones (Iliac crests).
The Iliac crest can be found by putting your hands on your hips
and feeling around. The horizontal stitch running in the center
of the waist belt should be centered on the Iliac crests. It
should NOT go round your waist/belly. The lumbar pad should
sit in your lumbar region, right above your butt.
|
  |
Shoulder strap length
adjustment
This will vary for people of different heights/torso lengths,
and also between the different stay-length Kifaru packs. First,
locate the metal slider on the top of the shoulder straps where
the lifter strap takeoff point is. Center the slider between
the bartacks. When correctly adjusted and worn, the slider should
sit right on top of your collarbones but below the height of
your shoulders.
|
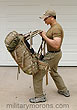  |
Donning - Lifting the
pack up
Start out by making sure that all adjustments are loosened,
especially the lifter straps and deltas.
I used to just lift the pack up and hoist it on my shoulders.
Worked fine for a light pack, but not good for the back with
heavier loads. Mel recommended that for a heavier pack, stick
a knee out and lift the pack onto your knee/thigh. That way,
it'll be at a level where you can slip your arm through a shoulder
strap, get the pack on one shoulder, and swing it around. Bending
forward slightly at the waist helps keep the pack from slipping
down your back while getting the other arm through. Note that
there are other methods of hoisting a large pack - use which
one works best for you.
|
 |
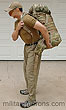
Shoulder straps
While leaning forward at the waist with a straight back, get
the pack high on your back, so the lumbar pad sits in the lumbar
region. Leaning forward gets the weight off the shoulder straps
and allows your to cinch them down more easily. Pull the shoulder
strap ends down and back. Do not overtighten the shoulder straps.
Sometimes it helps to give the shoulders a quick shrug to make
the pack 'jump' up onto the back a bit while pulling on the
shoulder strap ends at the same time.
NOTE: when pulling on all straps, the
direction of pull should follow the line of the strap as much
as possible, so it's not off an an angle from the tension locks.
In these pictures, I'm not always pulling along the correct
angle (I'm just grabbing the end of the strap in some cases),
but the red arrows show the intended direction.
|
 |
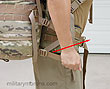
Hip belt
Click the hip belt buckle, and ensure that the centerline of
the hip/waist belt is centered on the Iliac crest of the hips.
It should NOT be around the waist. The top of the buckle is
about 2 inches below my belly button. If you're covering your
belly button with the buckle, it's too high. Pull the belt straps
forward (still at a downward angle since you're still bending
over at the waist). The hip belt should be TIGHT - almost crushing
the Iliac crests. All pressure should be around the hip bones,
not your belly.
|
 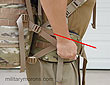 |
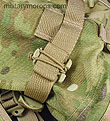
Delta straps
Reach back on both sides, and at the same time, snug up the
lower delta straps (left pic) by pulling forward (and up slightly).
Snug them just enough to put tension in the webbing, DO NOT
OVERTIGHTEN. Do the same for the upper deltas - snug them up
in the direction of the strap (forward and down), without overtightening
them.
|
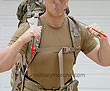 |
Lifter straps
Stand up straight, adjust the shoulder straps if necessary,
making sure that they're snug, but not overtightened. The lifter
straps will not work if the shoulder straps are overtightened.
Reach up and pull forward on the lifter strap ends. Snug them
up, do not overtighten. How much lift you get will depend on
your torso length and the length of the stays. For the shorter
packs like the Marauder and Zulu, you probably won't be getting
any shoulder lift. In that case, snugging up the lifter straps
just brings the top of the pack closer to your body a bit.
At this time, Mel then buckles the sternum strap. I've done
it earlier (after snugging up the shoulder straps) in these
pics. The sternum strap should be about 2" below your collarbones
(it's a bit low in these photos). It should not be too low as
that may restrict breathing by preventing your rib cage from
expanding. It should not be tight, and can even be a bit loose. |
Doffing the pack - when doffing the
pack, Mel goes through in a reverse sequence and untensions all straps.
Of course, if you need to drop the pack quickly, you just click out
of it, but untensioning all straps before you drop it (if you have
time) makes it easier to don when you put it back on. Otherwise, you
may be fighting the waist belt or the shoulder strap might be too
tight. Mel loosens the straps in this order:
-
Lifter straps
- Sternum strap
- Upper delta straps
- Lower delta straps
- Hip/waist belt
- Shoulder straps
Following the above tips should
give you a good starting point. Vary the adjustments when using the
pack to see what effect each adjustment has on the feel of the pack
on your back. Vary the weight distribution between hips and shoulders
when hiking to give either one a rest or relieve pressure. I've found
that sometimes the hip belt has to be loosened up a bit when hiking
up a steep hill, and tightened downhill. You'll get to know what works
for you depending on the terrain you're covering.
A note about
bending aluminum stays
Even though I was aware that the aluminum stays
could be bent/shaped to fit my back better, I neglected to do
so and just left them the way they came with my first Kifaru
pack. After a conversation with Mel, who was fiddling around
with his, I bent the stays on the Pointman to better fit my
back. When wearing the pack, I had noticed that a pressure point
right on the top of my butt, but ignored it because it didn't
seem like a big deal. However, after reshaping the stays, it
made a world of difference. Duh - I should have done it right
at the beginning. My back has more of a curvature to it than
normal, so bending the stays was necessary for me. If you've
got more of a standard curvature, you probably won't need to
adjust yours. Ever since I bent the stays on my first pack,
I always do it now.
To fit the stays to my back, I loaded up the pack with about
30 lbs, and tightened up all the straps as I normally would.
I took note of where the bottom of the stays were, and of all
the gaps and pressure points they made with my back. I then
took them out of the pack, held them up against my back (while
looking in the mirror), and bent them to fit the contour of
my back. I did one first, then did the other, using the first
one as a reference. I installed them in the pack and checked
the fit/feel. I made a couple of minor adjustments after that.
The aluminum can be bent by hand over the edge of a table etc.
The adjustments must be done with the pack loaded - your posture
(and curvature of your back) is different when you've got an
empty pack on your back. Before starting to bend the stays,
it's also advisable to trace the sotck curvature of the stays
on a piece of paper, so you can always return it to the stock
curvature if you mess up and need to start over. |
Strap management - for keeping the loose strap ends
tidy, I've found ITW's Web Dominators
to work very well:
|


