Personal Illumination Page 1 Page 2 Page 3 Page 4 Page 5 Page 6
TO VIEW FULL SIZE IMAGES: USERNAME and PASSWORD are both "mm"
|
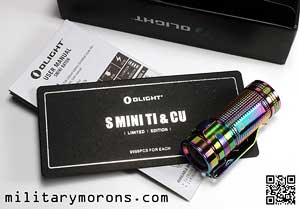
7/17/17 - The S Mini Ti (S1R) is the smallest CR123A battery compatible flashlight from Olight. It's a very compact EDC flashlight, powered by a single CR123A lithium battery (included), with a maximum output of 550 lumens. It ulitizes a Cree XM-L2 LED with TIR optic lens and delivers an artifact-free, balanced beam. The S Mini has four brightness levels and a strobe mode, covering an output range of 0.5 to 550 lumens. The "Limited Edition" S Mini series of Olights are their smallest CR123A-compatible flashlights, and are available in a variety of body materials and finishes. There's the S mini Cu, which utilizes copper alloy as its body material, and is available in Raw Copper, Rose Gold and Black finishes. There's also the S Mini Br, a raw brass which patinas over time. Then there's the S Mini SS (Stainless Steel), which has a stainless steel body with grey PVD coating. Shown here is the S Mini Ti, which has a titanium body and is available in Polished, Bead Blasted and Rainbow PVD finishes. The S Mini Ti Rainbow PVD is featured here. Each "Limited Edition" variant is limited to 9999 pieces. Not very 'limited' in a rare sense, but more so than their standard run quantities. Key Features of the S Mini Ti:
Advertised run times are as follows (on a fresh CR123 battery):
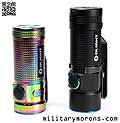
The S Mini Ti comes in an attractive cardboard gift box, with a battery installed and the instruction manual. That's it; no pouch or accessories. The box could have been made a lot smaller. At 2.15" long and 0.83" in diameter, the S Mini Ti is the smallest and lightest CR123-compatible flashlight that Olight offers. It's really tiny. The small size isn't realized until it's held in the hand. The S Mini is essentially the non-rechargeable version of the S1R Baton previously featured, which is itself a very compact flashlight. I've illustrated them both below, next to each other. The S Mini and S1R have different bodies; the S Mini incorporates the spring clip groove into the into the push button area instead of behind it. The push button area on the S Mini is rounded, vs. the hexagonal cross-section of the S1R. The raised push button switch prevents the S Mini from rolling if the clip is not installed. The S Mini also lacks the magnetic charging tailcap on the S1R Baton, which further reduces its overall length. One of Olight's signatures is the blue PVD (Physical Vapour Deposition) coating accents on the bezel and switch rings. The entire S Mini Ti Rainbow version is PVD coated in a very attractive multi-coloured finish. It's actually more of an oil slick instead of rainbow finish, as the main colours are blue, green and purple.
|
|
The S Mini body and tailcap are knurled for a secure grip, and each S Mini is individually serial numbered on the side. While the PVD coating is scratch resistant, it's definitely not scratch proof. Removing the clip will scratch the clip groove, as illustrated in the photo below of the clip removed, so don't do it just out of curiosity. I prefer to leave the clip on and find the light more useful that way. The clip is not reversible; and is oriented for bezel-up carry in a pocket. It can also be clipped to the brim of a cap. The clip has a small lanyard hole should you want to attach a lanyard to the light; since the tailcap does not provide a lanyard attach point. It's also slightly shorter than the S1R clip. The S Mini comes with a single CR123A battery. The positive end of the battery is installed facing the rear, as per the marking etched inside the cavity. Any CR123A or RCR123 battery can be used in the S Mini. The shorter tailcap of the S Mini lacks the magnetic and charging properties of the S1R Baton, so it can't be attached to a ferrous surface or the battery recharged in the light (unless you replace it with the tailcap of the S1R Baton, which is compatible, but won't match the finish).
|
|
Operation (all operations are performed with the side switch):
Notes/Observations - So, every since I started carrying the S1R Baton, it's become my favourite EDC light; along with the light from the H1R Nova. Both are very compact and provide two different beam types for different applications. The S Mini gives both of them a run for their money due to its compactness; and the only practical feature it gives up is the ability to charge an RCR123 battery in the light; and the 900 lumen Turbo-S mode of the S1R. The S Mini is well presented in the gift box and I can't think of anyone who wouldn't be happy upon receiving one as a gift. When I told my wife that I was revewing yet another flashlight, and that she might like to actually use this one; she was skeptical until she saw it. Besides the compact size, the uniqueness and beauty of the rainbow PVD finish really caught her fancy. She almost felt it was too small, and feared losing her grip on it until she had used it for a while and got used to it. Even in very small hands, you're pretty much using two fingers and a thumb to hold onto it. It's about the same size as a wine cork. That being said, the small size guarrantees that it doesn't take up much precious space in a purse or pocket; making it very convenient to carry. As mentioned before, performance of the S Mini is very similar to that of the S1R, so read that write up for more details. As with the other CR123 Olights, the amount of light coming from such a small, convenient package is impressive. It'd be difficult just to get one.
|
|
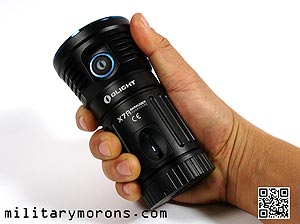
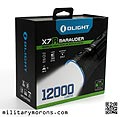
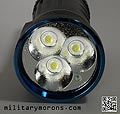
9/3/17 - The X7R Marauder from Olight is their most powerful light at the time of this writing. It's a mid-sized search light that boasts a claimed 12000 lumens; 33% brighter than the original X7. It ulitizes three Cree XHP70 LEDs and orange peel reflectors to deliver an even, artifact-free beam with minimal hotspot. The X7R has six brightness levels and a strobe mode, covering an output range of 10 to 12000 lumens. The X7R fits into the 'short and wide' category of high powered lights; the other being long and thin (typically with a larger reflector for increased throw). It's the redesigned X7, adding new features and increasing max output from 9000 to 12000 lumens. Its form is a combination of soda can for the head and thinner 'Red Bull' size can for the body; making it decently compact for the amount of light that it puts out. It's powered by four non user-removable 3000mAh 18650 batteries which are only rechargeable in the light via the Type-C USB charging port. Key Features of the X7R Marauder:
The X7R comes in very sturdy cardboard box with magnetic flap lid, and is nice enough to keep and use as a storage case for the light or its accessories; unlike throw-away packaging. The light comes cradled in its own foam cutout with the other items stored in their own compartment. Included in the package are the light, holster, lanyard, power adapter, charging cable and user manual.
|
|
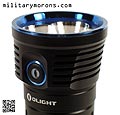
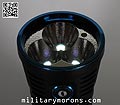
Physical characteristics - The X7R body is about the diameter of a Red Bull can, and very solid feeling at almost 24 oz. I'll refer to the side with the switch as the 'top', as that's how it's usually held with the thumb on the switch. The body has eight vertical grooves machined along its length, on either side of the lanyard attachment. On the bottom, there are three horizontal finger grooves. This assymetry helps you figure out the orientation of the light in the hand just by feel. The non-removable tailcap has vertical grooves around its perimeter to aid in rotating it, when opening and closing the charging port cover (more on that later). The head of the light tapers up from the body to a regular soda can diameter, and features deep heat sink grooves that help dissipate heat. The area around the switch is raised on either side of it, so that the switch is protected in a small depression. The raised areas also act as stops to prevent the light from rolling. Olight's signature blue PVD (Physical Vapour Deposition) coating accents the bezel, switch ring, and lanyard loop. At the front is the reflector with orange peel texture, housing the three cool white XHP70 LEDs. There's a small hole with a frosted window at one side of the reflector. You can see it at 5 o'clock in the picture below. That's the 'proximity sensor', which is a light sensor and senses the amount of light being reflected back into it. If an object is close enough to the front of the light to reflect into the sensor when it's on in the high and turbo modes, it will step down to the medium mode to prevent damage to the light and object (like, if it accidentally turns on in a closed bag). I found that by waving my hand in front of the light within about 8 inches, the sensor would work and the light would go down to medium. Once my hand was removed, it'd go back to whatever mode it was in.
|
|
The lanyard attachment is retractable, and is located on the body near the tailcap. It's recessed in a depression on the body, and has a little fingernail groove to grab it out with. It has a detent, so that it stays put in the recessed and extended positions. The supplied lanyard took a bit of coaxing with a sharp object to get through the hole. It's a nice lanyard, and has a lace lock on it for adjustment. I'd definitely use it were I to use this light on uneven terrain. Charging - The charging port is accessed by rotating the tailcap, which opens the blue sliding cover, allowing access to the Type-C USB cable. The cover protects the port from dust and moisture. When connected to power, the charging indicator lights in the port will glow either red (charging) or green (fully charged). The 5V 4A USB power supply looks to be of high quality, and is supposed to charge the X7R three times faster than a normal micro-USB cable. The cable is a bit longer than 2-1/2 feet, which should be adequate for most charging situations.
|
|
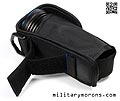
Multi-function Switch - The multi-function switch has the Olight logo on it, and isn't flat, but has a depression in the center like a donut. This makes it easy to find the center just touch. It requires just the right pressure (in my opinion) to actuate; it's not too light as to depress accidentally, and not too stiff as to require a hard press. It clicks positively. The switch is actually translucent, and will glow dimly when the light senses movement or shock. Just tapping lightly on the table will cause the switch to glow in a 'breathing pattern' that alternately grows brighter and dims in a repeating loop. This is it's 'locator feature', which really refers to locating the switch in complete darkness, rather the light (since the light itself needs to be moved; it doesn't sense movement away from the light). The switch will also glow when the light is on; it glows green normally, and red when the batteries are low. How much % power is left when the switch starts glowing red isn't stated. Holster - The included holster is nicely constructed, and made of light weight nylon. It's not a heavy cordura pouch; but decent for carrying the X7R on a belt or just as a protective cover when transporting the light or storing it in a car. It's a holster; not a fully enclosed pouch, and does leave the bezel and tail cap exposed on the sides. There's a nylon D-ring at the top of the belt loop, and the velcro belt loop will accomodate belts up to 2-1/2" wide. Undoing the blue stitching near the bottom of the loop opens that up to 3" wide belts. I found that my EMDOM 308 mag pouch was a good fit for the X7R, protecting it completely on the bottom and better on the top; while also being molle compatible.
|
|
Advertised output and run times are as follows (on full battery charge):
There's no 'moonlight' mode like the other Olights I have (very low output for pitch darkness); but the X7R has a 'nightlight' mode of 10 lumens, which is bright enough to illuminate a tent or small room for navigation. All operations are performed with the side switch:
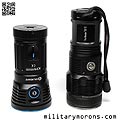
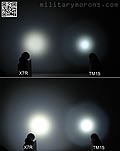
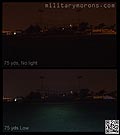
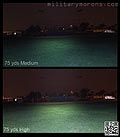
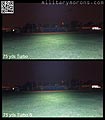
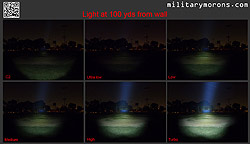
The modes are almost identical to that of the S1R and other hand held Olights, so the more I use both lights, the more I get familiar with the modes of operation. Notes/Observations - Flashlight technology just continues to advance; with output increasing for the same size light. A good example is the Nitecore TM15 shown below, which I featured 5 years ago. At the time, 2450 lumens was a lot for that size package. Five years later, and we have the Olight X7R; a 12000 lumen light in a smaller package, also using four 18650 batteries, putting out approximately five times the amount of light. Since the TM15 is the only other light I have in this format, I'm using it for comparison here. Like the TM15, the X7R is advertised as a 'searchlight', due to its output and physical size. It's not something you'd EDC in your pocket or on your belt; it's intended more for search & rescue (or people like me who just like really bright flashlights). I have to admit, it's just fun to be somewhere in the outdoors, camping etc, and turn on one of these light-blasters and light up an entire hillside for a moment. As with all of the other Olights I've featured, Olight gets points on presentation, from the professional-looking packaging to the design, aesthetics and overall quality of the lights. The signature blue accents are also a classy touch, as always. The X7R is at the other end of the spectrum of Olights I've featured; the last being the dimunitive S Mini featured right above this writeup. The X7R is a palm-filling pound and a half. Still, it fits in the car glove box and backpack pockets easily, taking up about as much room as a 12 oz disposable water bottle. The glowing switch isn't that useful as a locating feature, since I can easily find it in the dark just by feel; but more useful to indicate when it's time to recharge the battery. One feature that the TM15 has that I'd like to see on the X7R is the threaded insert that allows it to be used with any camera tripod or pod. I've actually used the TM15 with my gorilla pod while camping, to point it somewhere without trying to orient it on a rock. If you take a look at my previous writeup on the TM15, you'll notice that the advertised max throw of the TM15 is very similar to that of the X7R. Both are around 400 yards. Even though the TM15 has approximately 1/5 the lumens, it can reach that far because it's designed as more of a 'throwy' beam with its deeper reflectors; while the X7R is more 'floody'. This is apparent when you compare beam patterns below. The TM15 has a much more concentrated hot spot whereas the X7R's is much wider. The TM15 is a garden hose while the X7R is a fire hydrant. In the photo below, the X7R is on the left and the TM15 is on the right. Both are set at low mode; 500 lumens for the X7R and 300 lumens for the TM15. The only difference between the upper and lower photos is the exposure to better illustrate the beams. I went out to a field to take some photos. I set the camera on manual and adjusted the shutter speed and aperture such that the photo taken under ambient light conditions looked pretty accurate. Then I snapped pictures with the different X7R light modes without changing the settings on the camera. I took them at two distances; 50 and 75 yards. It was a humid night with quite a bit of moisture in the air, so that diffused the light somewhat. You can see in the photos, though, how much light is put out. For the 75 yds shots, I decided just to shoot a video, then capture screenshots, which is why the resolution isn't as good as the ones above. Compared to the beamshots from the TM15, the X7R has similar throw, but illuminates a much larger area vs. a spot. With the TM15 (right photo below), you can see the beam, which has very little spill and a concentrated spot. The X7R, on the other hand, just floods the entire area with light; so much so that it extended beyond the camera's field of view. The difference is also apparent when doing a ceiling bounce test. The TM15 was bright, but the X7R is too bright for a normal room. It's a very impressive amount of light coming from a handheld light smaller than a soda can. It's also important to note that twice the lumens doesn't mean that the light will appear twice as bright to the human eye, as it's not a linear scale. When scanning an area with either light, the X7R just covers more ground quicker; and more effective in that respect. For me, the max usable distance is under 200 yards at night. That's about as far as I can resolve smaller objects. But a brighter light definitely helps. At the higher modes; especially Turbo and Turbo S, the head definitely heats up until it gets quite warm before the output is stepped down. This is also where the proximity/light sensor functions as a safety feature and brings down the light level to medium, where the light doesn't heat up enough to cause concern. The light will gradually dim to medium if an object is sensed, then pop back up to the previous mode when the object is removed. The heat does seem to dissipate quite quickly after the light is turned off from the Turbo modes. Charging is as straightforward as can be; plug it into the wall with the cable and power adapter, and check back a while later to see if the charging light is green. I can understand how some users may not like the non user-removable battery pack. This prevents the user from swapping out spent batteries for fresh ones immediately. This can be a deal-breaker for someone wanting to bring this along on an extended trip with no access to a wall plug or USB port. What it boils down to is individual need and use. Even with a 2nd set of four 18650 batteries, you'd eventually need to recharge them. Depending on the situation, the user just has to manage the usage based on knowing the run times at different outputs. This is a specialized light and it can always be supplimented with smaller, lower power lights like a headlamp for trail navigation etc. So, with the X7R, you essentially get a good balance of throw and flood. It's not the longest throw light that Olight has, but it has very respectable throw for a flood searchlight and will illuminate a wide area for quite a distance. Now I'm wondering how far their next thrower will reach if they bump up the lumens like they did with this. All in all, a pretty impressive package. The X7R is available directy from the Olight store or ebay.
|
|
10/29/17 - The M2R Warrior is Olight's new rechargeable dual switch tactical LED flashlight. It is powered by a high discharge rate rechargeable 18650 lithium battery covering an output range of 1-1500 lumens. It ulitizes a Cree XHP35 HD LED with textured aluminum reflector to deliver an artifact-free, focused beam. The metal tail cap is quiet and functions as both a momentary or on/off switch. A single press of the tail switch allows the user to access the turbo or strobe modes instantly. The M2R has six brightness levels and a strobe mode. Key Features of the M2R Warrior:
Advertised run times are as follows (on full 18650 battery charge):
Note that Turbo mode of 1500 lumens is tested when the battery is full. The maximum output varies as the battery voltage changes. The M2R comes in a nice cardboard box, with the light's relevant information and specs printed on it. Opening the box and sliding the tray out reveals a plastic protector with some first-use information. The flashlight itself is nestled in protective foam, alongside another cardboard box which contains the holster, lanyard and magnetic cable charger. The user manual is at the bottom of the box. The M2R is slightly larger than the previously featured S30R Baton III flashlight. I've illustrated the M2R below with the S30R and SureFire Centurion for comparison. It's approaching the size of the old SureFire P60 lights, which were the gold standard for tactical handheld lights for a long time, and is just a bit smaller than the current 6PX. The M2R body has ribbing instead of the knurling of the S30R. The head and bezel are not meant to be removable by the user. The section behind the head is larger with a hexagonal cross-section with heat-dissipative grooves, which prevents the light from rolling. The side switch, which is a rubber button is located on this section, and has a little raised dot in the middle for additional feel in the dark. The M2R has the signature Olight blue PVD coating accents on the bezel and side switch rings, which are very attractive. The bezel also has small radial cuts around its perimeter, whch is a nice cosmetic touch. While not as aggressive as some tactical light bezel crenellations, I wouldn't want to be struck in the head with it. The head has some cosmetic grooves machined longitudinally, and the model and serial number printed on it. The M2R tail switch/cap differs from all other tactical light switches I've encountered by the fact that it's made of metal; not rubber. The bottom of the tailcap is flat to allow the light to stand on its tail, and in the center is the switch. The switch performs a number of functions (more on the operation later) and can be pressed partially (soft click) and all the way in. The tailcap is magnetized for attaching the light to a ferrous metal surface.
|
|
The M2R comes with the same lanyard that was provided with the S30R, with a threading needle attached to get it through the small hole in the tail cap. The removable spring pocket clip is bi-directional; it works whether the bezel is up or down in a pocket. The body has two locations to attach the clip at; one right behind the side switch, and the other right in front of the tail cap. I pefer to attach the clip at the tail cap as it enables the light to sit deeper in my pant pocket; without the tail cap sticking out of it. The side switch has a very dim red light behind it that lights up when the button is depressed during lockout mode. It will also light up when the battery is low enough. The included holster is actually pretty nice. It's got a D-ring at the top for hanging it off a carabiner or hook; and both a belt loop and strap with snap. The strap is not molle-compatible. The inside if the holster is lined with fabric to protect the light.
|
|
The M2R comes with a high-drain 10A Li-ion ORB-186S35 18650 3500mAh 3.6V protected battery. At first glance, when comparing it to the battery included with the S30R, I was wondering what the difference was. The performance specs were the same, yet the part numbers were different. The S30R comes with a ORB-186C35. Upon closer examination, and re-reading my writeup on the S30R, the S30R uses a customized, dual-polarity Olight 3500mAh 18650 battery, designed especially for magnetic charging in the S30R. It has an additional '-' contact ring around the positive terminal. Standard 18650 rechargeables cannot be magnetically charged in the S30R. The M2R battery, however, is conventional. You can charge it inside or outside the M2R. The M2R can also charge other conventional 18650 batteries, but high-drain ones are recommended. The positive end of the battery is installed facing the rear. Charging is done in the light with the included magnetic charging cable (MCC). I find this a really neat option, as it can be used anywhere you have a USB port (they're all over the place nowadays) or adapter. The MCC has a blue anodized USB plug on one end, and a matching blue anodized button/base. The button itself is magnetized, and has gold-plated contacts which interface with the metal tailcap (also magnetized) of the M2R. Get the blue button close to the end of the light and it snaps right to it. The included MCC cable is 19" long, which is long enough such that your light isn't hanging from a wall socket USB charger or computer USB port. When connected to a power source, the base lights up where the cable enters it; red for charging, and green for charged. The M2R can also be charged on Olight's micro dock charger.
|
| Operating modes The M2R has two main modes: "Standard" and "Tactical". Standard mode (1000 lumen Turbo and constant on) - In standard mode the Turbo level is limited to 1000 lumens. A soft press of the tail switch activates the 1000 lumen Turbo level momentarily. A deep press activates the Turbo in constant on until pressed again to turn the light off. Tactical mode (1500 lumen Turbo and momentary strobe) - In tactical mode, the Turbo level is bumped up to 1500 lumens. A soft press of the tail switch activates the 1500 lumen Turbo level momentarily. A deep press activates the Strobe mode. The strobe is on as long as the switch is pressed in. When it's released, the light turns off. Switching between Standard and Tactical modes can abe accomplished one of two ways:
Personally, I prefer method 1 because it's quicker. Side Switch Operation (brightness level operations are performed with the side switch):
Tail Switch Operation
Notes/Observations - Olight has continued to impress me with the quality of their lights, which is why I keep featuring them on my site. The M2R Warrior is no different; displaying the same attention to detail in the packaging, presentation and quality of the product. It's a great light overall; ruggedly constructed and well made. The M2R is not just a different version of the S30R Baton; even though they're both single 18650 lights; it's a completely different light. They don't even share the same texturing pattern; Olight could have just use the same knurling on the M2R as it did on the S30R but they chose to give it a different look. It's a larger light than the S30R in all respects. The reason for the increased girth of the body is that it is a double tube design, necessary for magnetic charging conventional batteries via the tail cap. Even so, it's not at all cumbersome to EDC in a pant pocket. As mentioned before, I prefer to attach the clip at the tailcap end, vs. at the side switch location. I had mentioned in my S30R write up that I would have liked this option on the S30R. This way, the light sits deeper inside my pocket, bezel down. I also found that keeping the clip rotated either in line with the side switch or directly opposite it helps me locate the side switch by feel. The side switch is very low profile, and without the clip as a reference, I have to feel around the hexagonal section until I find the side switch. Right now, I have the clip in line with the side switch, which I feel is more comfortable in my hand and I always know that the switch is immediately in front of the clip. So what makes a flash light a 'tactical' light? In my opinion, this 'tactical flashlight' thing was pioneered when SureFire introduced their 6P, which was the original compact high-output flashlight with push button tailcap that used the CR123 Li-ion battery. Before that, the Maglight company made large, aluminum lights that could also be used as non-lethal force weapons (billy clubs), but those used conventional D or C-cell alkaline batteries. Techniques and tactics built around the use of the compact tactical light were developed. Techniques like the FBI, neck-index, Rogers/SureFire, Ayoob, Harries, etc centered around the use of the push button tail cap. That's why to me, a light labeled as a 'tactical' light should be able to be used with these techniques, even if some may be not be so commonly used anymore (with the advent of weapon-mounted lights). The tactical tailcap/switch has a unique feel to it; or at least I don't own any other lights with a metal switch like this one. The switch is flush with the end, so there's little chance of accidental activation. It's also dished to center your finger and provide a tactile reference. However, because the switch is flush, I find it harder to depress with the thumb than one that sticks out, like on my old SureFire C2. It's not the amount of pressure I'm referring to; it's the angle of the thumb. I can't extend the thumb as much so it feels cramped. I didn't notice it just by playing with it briefly, but after using it for an extended amount of time; I felt my thumb fatigue faster than with a the C2. I tried swapping back and forth just to be sure, and confirmed it. YMMV of course - this was just my own observation. Since the switch does not protrude beyond the base, the M2R cannot be used with the Rogers/SureFire technique where the light is held like a syringe between the index and middle fingers and the light activated by pulling it back against the palm below the base of the thumb. So, that's one of the factors that needs to be weighed if you plan on using this in the thumb mode with Turbo a lot - slightly more tiring thumb operation with the thumb vs. magnetic base/flat base for standing on end, magnetic charging etc. Most of the time, it's easier just to to use the side switch. The magnetic tail cap does come in handy; it's strong enough to hold the M2R horizontally. To my naked eye, I can't tell much difference in the 1000 lumen Turbo mode of the M2R and the S30R's 1050 Turbo in brightness. The S30R does have a smaller spot; and the M2R covers a wider area. There's definitely a noticeable difference in the 1500 Turbo mode though. To illustrate the slight difference in beam shape, I photographed the S30R in cool white (bluer tint) next to the M2R in neutral white, which is slightly warmer. The M2R has more throw than the S30R beam so it has the advantage at a longer distances. As mentioned above, I found that the flush nature of the M2R's tail switch design is a compromise that you'll have to consider if you intended to employ the tailcap as part of a handgun shooting technique. I did not find it as easy to use as lights with a protruding button. On the other hand, I found that the option of using the tail switch makes the M2R more versatile than a side-button/switch light only. The two modes of the tailcap switch keep it simple, which is good under stress. You don't have to scroll through a bunch of brightness levels to get to Turbo. Just hold it in the ice-pick grip and you've got instant access to Turbo modes or strobe, plus it's in the correct orientation to be used as a striking instrument. Its heft (it's not a super flyweight) also lends itself to being used for a personal defense tool. I would not want to be beaned by the end of one. In that sense, I guess, the M2R earns its 'tactical' designation. All in all, it's a very good addition to the lineup. The M2R Warrior is available from the Olight Store, or their Ebay Store.
|
ATTENTION! DO NOT LINK DIRECTLY TO MY IMAGES
/ . PLEASE
OBSERVE AND RESPECT OUR COPYRIGHT! . /
©opyright by MilitaryMorons.com. All Rights Reserved. Reproduction, Duplication,
Distribution Strictly Prohibited.
Unless mentioned otherwise, content and images are the
property of militarymorons.com and are not in the public domain.
They are not to be used without
permission. Please Contact
me for permission to use any images or content herein.
